QT Designer + PyQt + Webscrapping 的技術與應用(一)
Objective:
製作網路資料蒐集與分析的 Python GUI 應用程式。
參考網站:
一、https://steam.oxxostudio.tw/category/python/spider/about-spider.html
二、https://www.geeksforgeeks.org/python-web-scraping-tutorial/
範例 1: 製作一簡單的 GUI,透過網址連結到一個圖片搜尋的網站,根據關鍵字搜尋圖片並下載至 GUI 的圖片框架,展示如下圖。
目標網址:https://unsplash.com/
程式功能:
輸入關鍵字,立即查詢並下載與呈現。
加入 progress bar 以顯示下載進度。
注意事項:學習從網路搜尋並擷取所需的資料,最好選擇較單純的網站開始。本範例採用的網站,專門提供各式分類且免費的影像圖片,供查詢並下載使用。由於功能單一,其網頁的表達也容易分析,因此有利認識網路爬蟲的技術。
一樣是擷取影像圖片,不同的網址的網頁設計也不同,因此很難發展一個爬蟲程式能適用於所有網站。這也是在上圖的示範裡,將網址以 label 的型態固定住,只留下 line_edit 的元件,供使用者輸入關鍵字。
網路爬蟲常用的兩個套件是 requests, BeautifulSoup,前者負責擷取網頁內容,後者則是分析網頁內容並過濾出想要的部分。
這個程式碼的重點集中在 def urlSearch(self) 這個函數。其中指令 results = soup.find_all(“img”, class_=”ht4YT”, limit=9) 最為關鍵。find_all 是套件 BeautifulSoup 用來分析與篩選網頁內容的指令,在此專責找到所搜尋到的影像圖片的網址。這裡有一個網頁瀏覽的概念須要釐清;當網頁內容出現影像圖片時,不論大小或格式,都是以網址的形態出現在網頁裡。瀏覽器會自動針對網頁內容出現網址的部分,再對網頁伺服器發出請求,此時網站才會將圖片傳送給要求的瀏覽器,最後呈現在正確的位置。因此當我們利用 request.get(url) 取得完整的網頁內容時,必須將所需的圖片的網址抽離出來,再次向網站提出 request,譬如迴圈中的 img = requests.get(link),這個 link 就是圖片所在的網址。讀者可以使用 debug 模式,觀察這些 link 的內容。
下列的程式將圖片的連結(網址)一一挑出來,並發出 request 下載後,儲存在電腦裡。因為下載以 12 張為限,因此在迴圈裡製作一個 progress bar 以一張 1/12 的進度顯示。12 張圖下載並儲存完畢,最後再一張張呈現在 12 個 labels 裡,這個速度很快,因此才將 progress bar 放在下載與儲存這一端。
圖片呈現出來後,因為沒有其他作用了,為了不佔硬碟空間,因此即刻刪除,沒有保留之必要。
這個程式執行時,有時候會出現前兩排的圖片完全一樣,如果再執行一次或多次,又會是正常的 12 張不同的圖片。造成這個現象的原因,可能是網站那邊的網頁(也是一支程式執行的結果)丟出重複的 html 碼,因為檢查網頁內容確實也發現重複的網址。不過這並不重要。這個範例只是提供練習而已。


from PyQt6 import QtWidgets, uic
from PyQt6.QtGui import QPixmap
from bs4 import BeautifulSoup
import requests
import sys
import os

class MainWindow(QtWidgets.QMainWindow):

    def __init__(self, *args, **kwargs):
        super(MainWindow, self).__init__(*args, **kwargs)

        #Load the UI Page by PyQt6
        uic.loadUi('PyQt_Webscrapping_img.ui', self)

        # Signals
        self.lineEdit_url.returnPressed.connect(self.urlSearch)
        self.pBut_search.clicked.connect(self.urlSearch)

    def urlSearch(self):
        url = "https://unsplash.com/s/photos/"
        url = url + self.lineEdit_url.text()
        response = requests.get(url)
        img_dir = "images/"
        num_images = 12
        soup = BeautifulSoup(response.text, "html.parser")
        results = soup.find_all("img", class_="ht4YT", limit=num_images)
        image_links = [result.get("src") for result in results]
        # download images and write as files
        for index, link in enumerate(image_links):
            img = requests.get(link)
            with open( img_dir + str(index+1) + ".jpg", "wb") as file:
                file.write(img.content)
                self.progressBar.setValue(int((index+1)/len(image_links)*100))

        # Show image files and then remove files
        for i in range(len(image_links)):
            imgname = img_dir + str(i+1) + ".jpg"
            setlabel = "self.label_"+str(i+1)+".setPixmap(QPixmap('" +imgname+"'))"
            exec(setlabel)
            os.remove(imgname) # remove image files after display

def main():
    app = QtWidgets.QApplication(sys.argv)
    main = MainWindow()
    main.show()
    sys.exit(app.exec())

if __name__ == '__main__':
    main()
練習:前一個範例的 HTML 原始碼並不容易找到圖片所在。試試看愛迪達的官網產品網頁,譬如 https://www.adidas.com.tw/hall?tags=ADSAA02-ADSAA03-ADSAB02-ADSAC04 展示女性外套。這個網頁的原始碼較容易分辨,可以試著用關鍵字找到圖片的 html code。套用前面的程式碼,只需更動幾行即可。
從這個練習可以繼續下去,擴展功能,譬如加入「下一頁」「上一頁」的功能、加入每個產品的描述及價格。而表現方式當然要各顯神通了。


#  與範例 1 不同之處
...
        url = self.lineEdit_url.text()
        response = requests.get(url)
        img_dir = "images/"
        num_images = 12
        soup = BeautifulSoup(response.text, "html.parser")
        results = soup.find_all("img", class_="lazy", limit=num_images)
範例 2:如範例 1 透過網址下載該網站的圖片並呈現在 GUI 裡,這次要加入文字,看看 Python 如何捕捉網頁內的文字。本範例舉〈自由電子報〉為例,擷取分類新聞的前幾則,譬如,即時新聞的前四則,呈現每則新聞的代表圖片與標題(title),如下圖。
目標網址:〈自由電子報〉即時新聞網址:https://news.ltn.com.tw/list/breakingnews
程式功能:
選擇新聞類別,呈現該類前四則新聞的代表圖片與標題文字。
增加「關鍵字查詢」的功能。上述自由電子報的網頁左上角有一個關鍵字查詢新聞的功能。試著在下圖中的「新聞類別」右邊,加入關鍵字查詢。在加入前,必須先觀察關鍵字查詢的網址與網頁內容,找到圖片與標題的位置。
注意事項:
設計者必須預先知道各類新聞的網址,譬如「熱門」新聞的網址為:https://news.ltn.com.tw/list/breakingnews/popular。在下列的參考程式碼中,以 dictionary 的方式存放新聞類別與網址的相對應文字,譬如 “熱門”:”popular”,”社會”:”society”。
設計前必須觀察圖片與文字所在的網頁,其關鍵標籤為何,才能精準的用 BeautifulSoup 套件的函數 find_all 去掌握圖片與文字。下列的程式碼分別以 def newsSearch(self) 與 def titleSearch(self) 下載圖片與標題。
從網頁擷取圖片網址或標題文字,並沒有唯一的方法,所謂戲法人人會變,巧妙各不同而已。能精準地捕捉到便是王道,不論精簡或繁瑣。不過有一原則:盡量利用 BeautifulSoup 套件的優勢,以網頁的標籤做初步的篩選,最後不得已才訴諸 python 的文字比對功能。
本範例處理圖片的下載與呈現的方式與前個範例不同,不再存檔、開檔、讀檔、刪檔,而是直接從網路讀取後,變更為圖形格式,再填入 label 裡。詳見下列程式碼的副程式 def show_image(self, image_links):


from PyQt6 import QtWidgets, uic, QtGui
from PyQt6.QtGui import QPixmap
from bs4 import BeautifulSoup
import urllib.request
import requests
import sys
import os

class MainWindow(QtWidgets.QMainWindow):

    def __init__(self, *args, **kwargs):
        super(MainWindow, self).__init__(*args, **kwargs)

        uic.loadUi('PyQt_Webscrapping_news.ui', self)
        self.setWindowTitle('自由電子報新聞')
        self.news_classification = {"即時":"","熱門":"popular","政治":"politics","社會":"society","生活":"life"}
        self.newsSearch()

        # Signals
        self.comboBox_class.currentIndexChanged.connect(self.newsSearch)
        self.lineEdit_keyword.returnPressed.connect(self.searchByKeyword)
    # Slots
    def newsSearch(self):
        url = "https://news.ltn.com.tw/list/breakingnews/"
        classification = self.news_classification[self.comboBox_class.currentText()]
        url = url + classification
        response = requests.get(url)
        soup = BeautifulSoup(response.text, "html.parser")
        results = soup.find_all("img", class_="lazy_imgs_ltn", limit=4)
        image_links = [result.get("data-src") for result in results]
        self.show_image(image_links)
        self.titleSearch()

    def titleSearch(self):
        url = "https://news.ltn.com.tw/list/breakingnews/"
        classification = self.news_classification[self.comboBox_class.currentText()]
        url = url + classification
        response = requests.get(url)
        soup = BeautifulSoup(response.text, "html.parser")
        results = soup.find_all("h3", class_="title", limit=4)

        for i in range(len(results)):
            title = results[i].text
            setlabel = "self.title_"+str(i+1)+".setText(title)"
            exec(setlabel)


    def show_image(self, image_links):
        for index, link in enumerate(image_links):
            data = urllib.request.urlopen(link).read()
            image = QtGui.QImage()
            image.loadFromData(data)
            setlabel = "self.img_"+str(index+1)+".setPixmap(QPixmap(image))"
            exec(setlabel)

def main():
    app = QtWidgets.QApplication(sys.argv)
    main = MainWindow()
    main.show()
    sys.exit(app.exec())

if __name__ == '__main__':
    main()
練習:為範例 2 加上關鍵字搜尋功能。
這個功能來自網頁本身提供的搜尋,如圖一,請留意觀察其搜尋結果的網址,譬如,關鍵字為「唾液快篩」:https://search.ltn.com.tw/list?keyword=唾液快篩。參照這個網址,尤其是前面那一段基底網址:https://search.ltn.com.tw/list?keyword=….,製作出如圖二的關鍵字搜尋。


練習:為範例 2 加上 timer 的機制,也就是每隔一段時間,譬如 10 分鐘,便更新一次內容。
練習:將範例 2 的新聞來源改為〈聯合新聞網〉,網址:https://udn.com/news/breaknews/
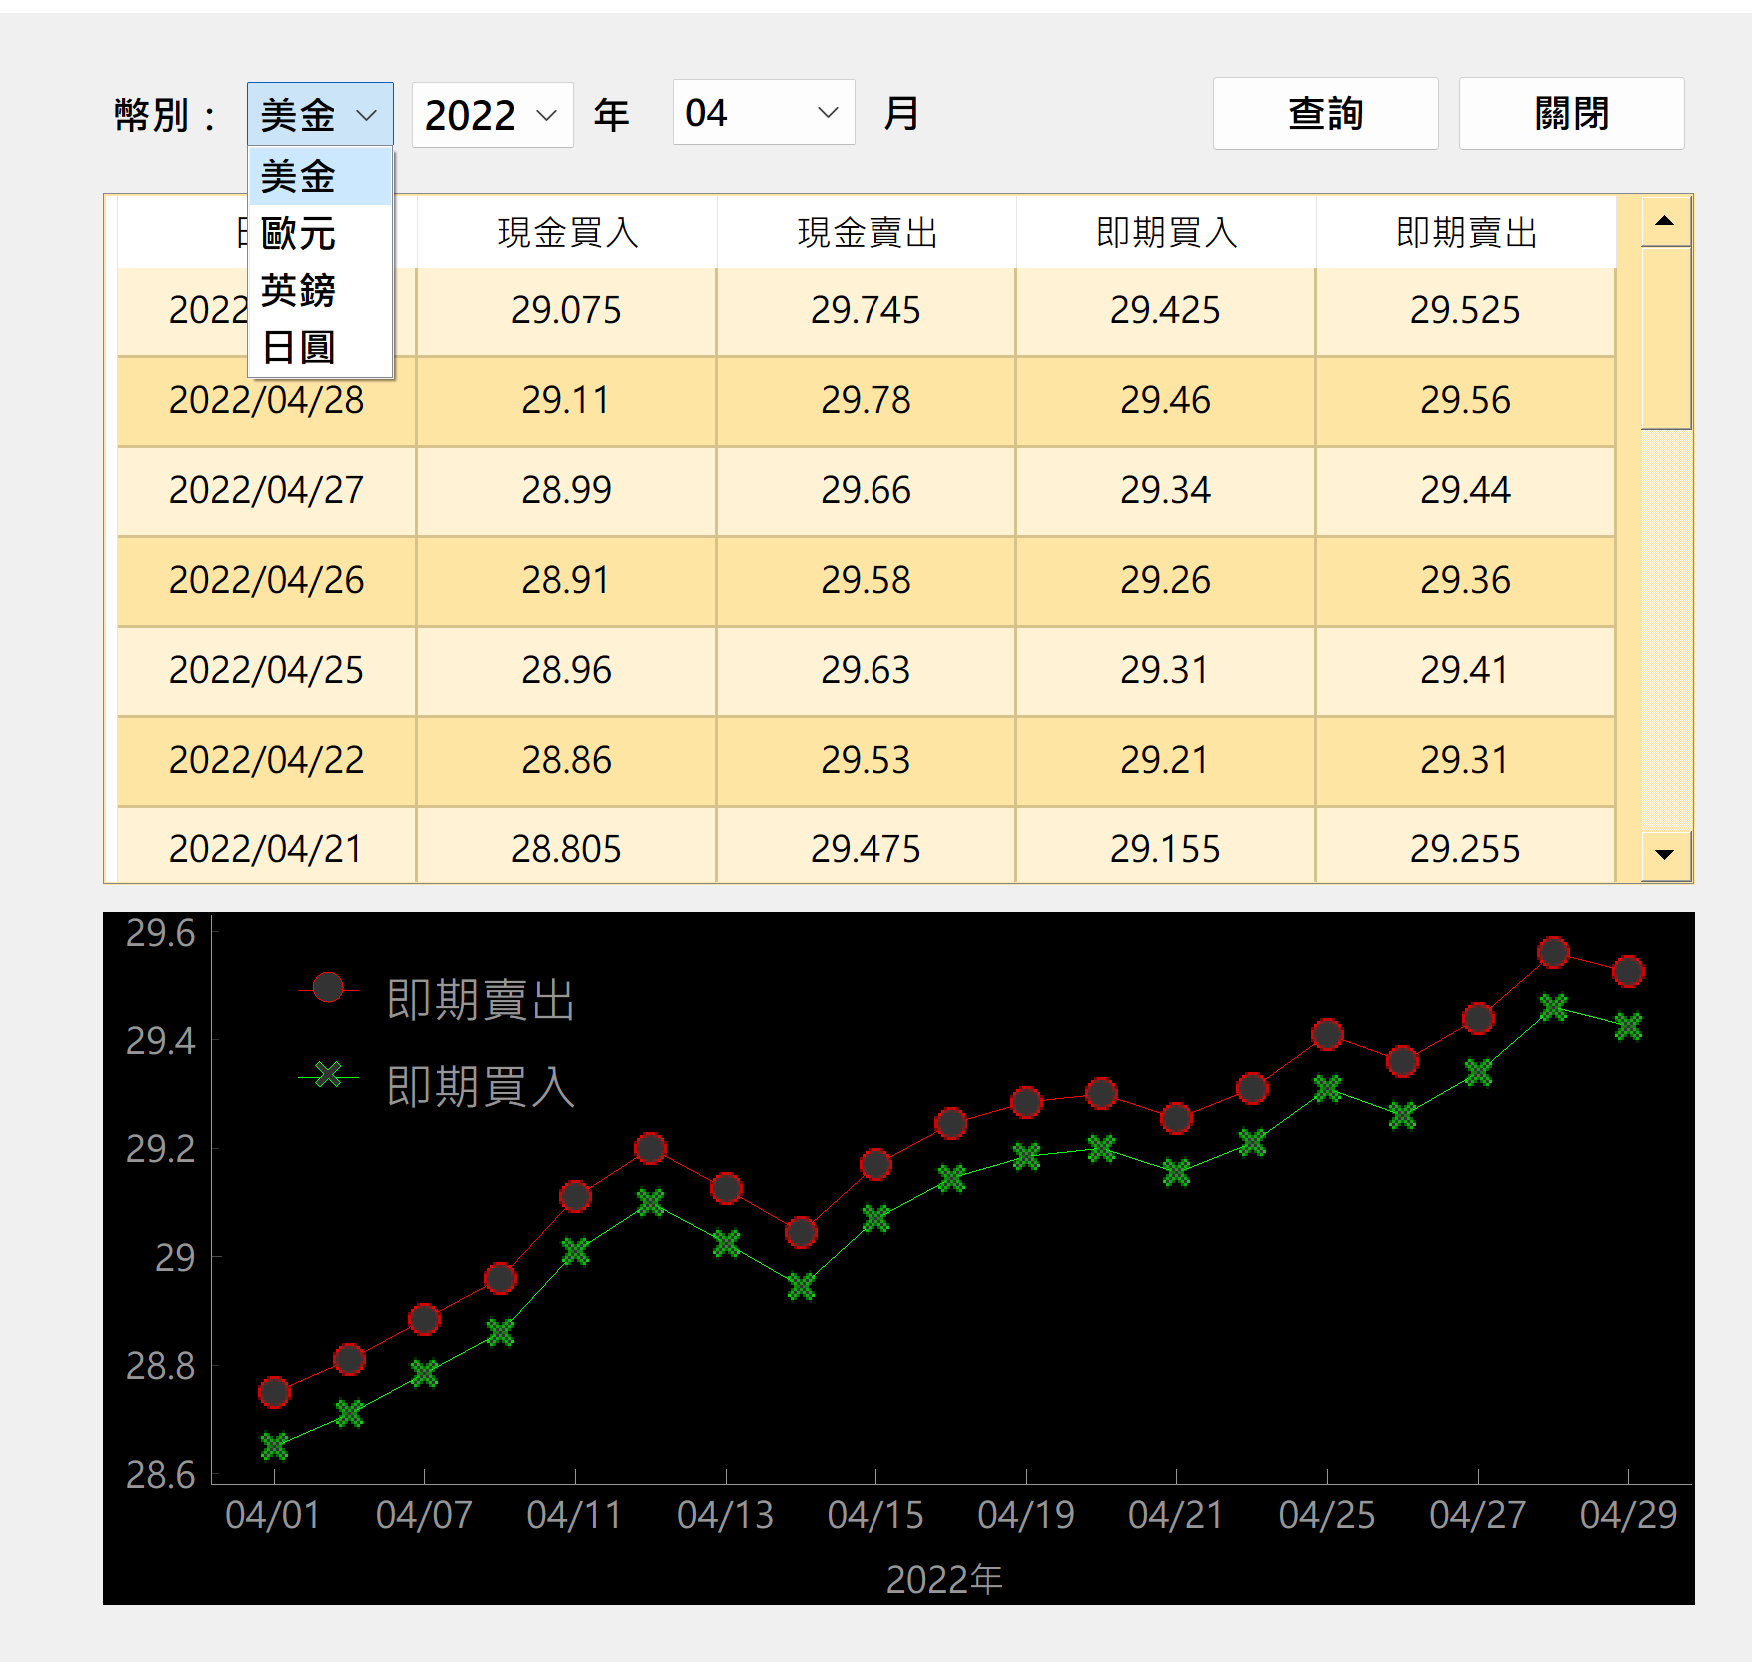
範例 3: 數字資料也是網路爬蟲的目標。數字資料包含即時性與歷史性資料,前者適合加入計時器,定時抓取,後者則是蒐集資料。本範例以台灣銀行的匯率歷史資料為例,以其簡單作為示範。如下右圖。
目標網址:台灣銀行匯率網址(以2022 年 4 月為例):https://rate.bot.com.tw/xrt/quote/2022-04/USD
程式功能:
可以選擇幣別、年與月,抓取一個月的匯率資料,並以圖與表呈現。
另,可加入滑鼠的指標,秀出特定日期當天的匯率數據表(可從台銀網站找到相關網址)。
注意事項:
從目標網址的後面可以看到 2022-04 與 USD 兩個與時間及匯率別的”參數”,意思是只要變更這兩個地方,便能擷取所需要的年月與幣別資料。
下列參考程式尚未加入無資料的警語。讀者可以自行加入。
圖一的表格刻意隱藏左邊的 index 數字,這個隱藏動作可以在下列程式的 TableModel 裡找到被註解的兩行。
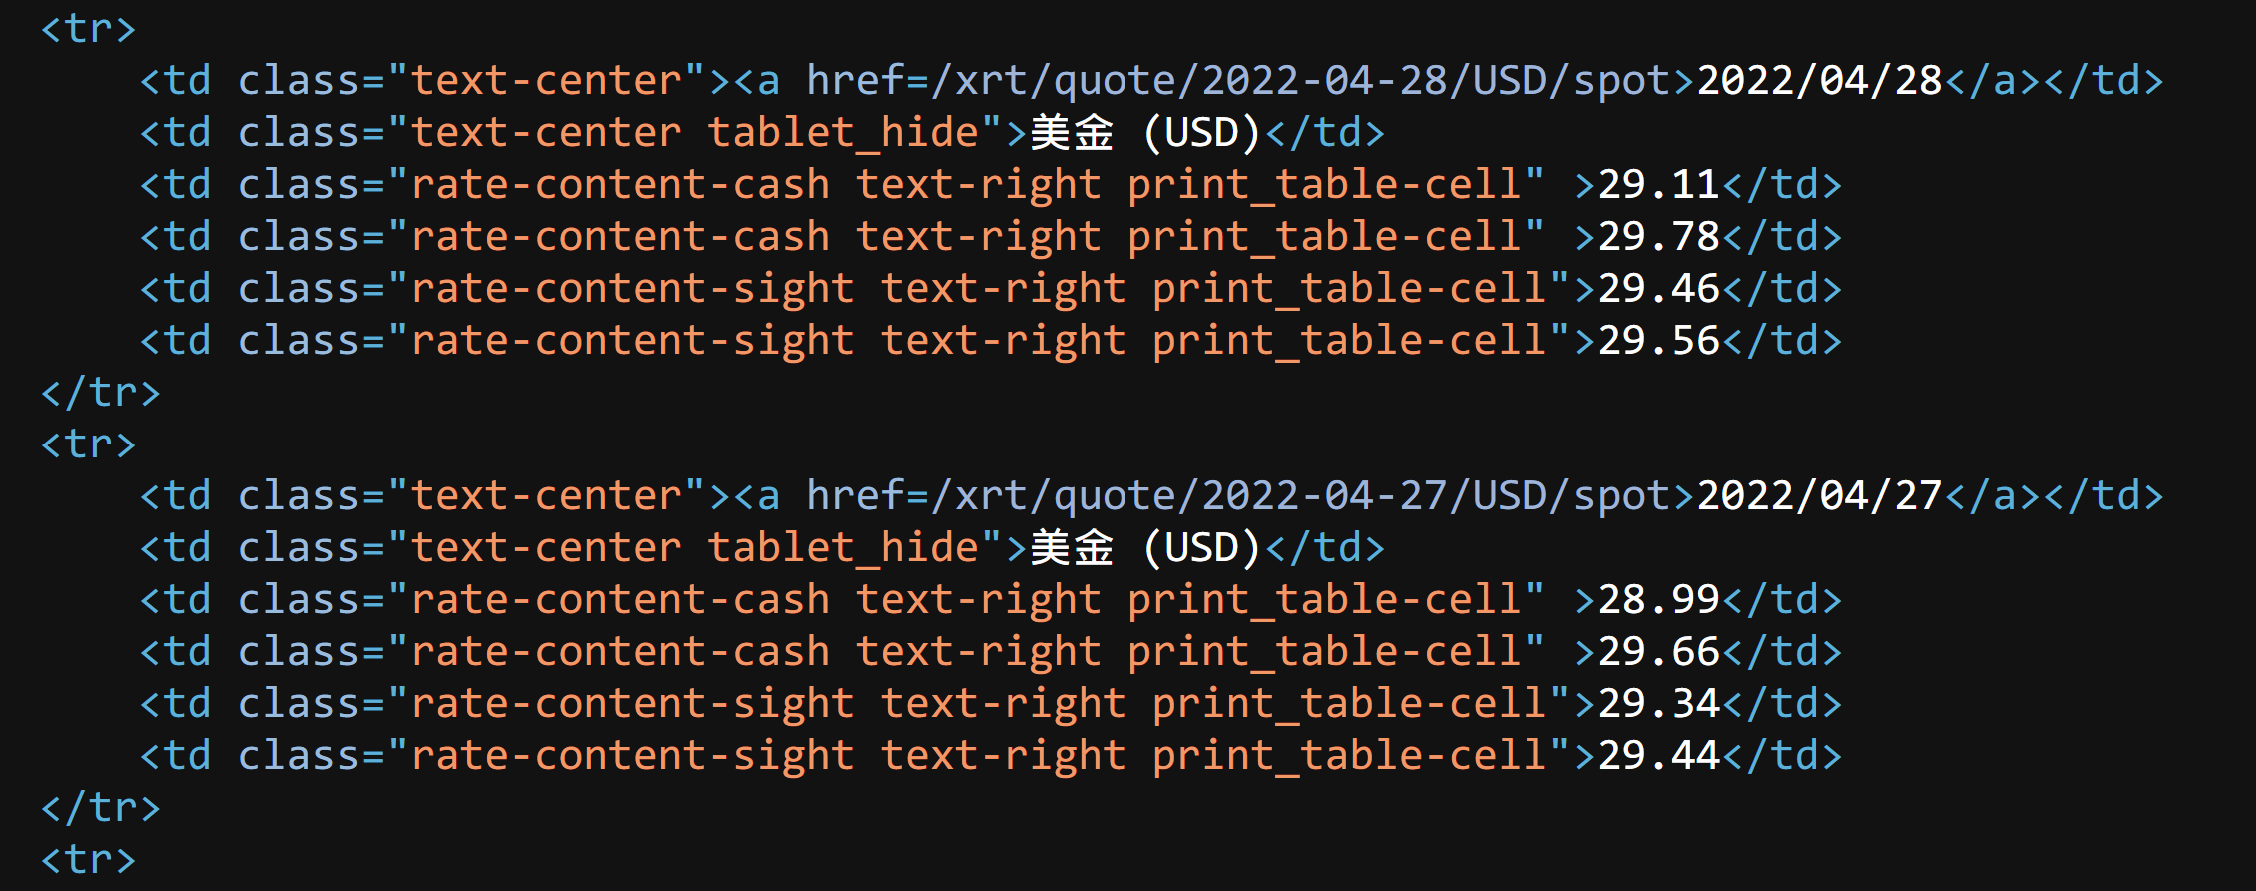
下列程式雖長,其實與爬文相關的僅區區幾行而已。主要是這個台銀的網頁資料擺放的位置相當明確,可以用 BeautifulSoup 篩選到所要的資料。如圖二所示,只要鎖定 HTML 的標籤差異,便能分離出所需要的三種資料:日期、現金買入/賣出、即期買入/賣出。接著以 .text 的方式取得標籤以外的文字部分。剩餘的程式碼主要處理資料的編排與如何呈現在表格與繪圖區。
from PyQt6 import QtCore, QtWidgets, QtGui, uic
from PyQt6.QtCore import Qt
from bs4 import BeautifulSoup
import numpy  as np
import pandas as pd
import requests
import sys

class TableModel(QtCore.QAbstractTableModel):

    def __init__(self, data):
        super(TableModel, self).__init__()
        self._data = data

    def data(self, index, role):
        if role == Qt.ItemDataRole.DisplayRole:
            value = self._data.iloc[index.row(), index.column()] #pandas's iloc method
            return str(value)

        if role == Qt.ItemDataRole.TextAlignmentRole:
            return Qt.AlignmentFlag.AlignVCenter + Qt.AlignmentFlag.AlignHCenter
            # return Qt.AlignmentFlag.AlignVCenter + Qt.AlignmentFlag.AlignLeft

        if role == Qt.ItemDataRole.BackgroundRole and (index.row()%2 == 0):
            return QtGui.QColor('#fff2d5')

    def rowCount(self, index):
        return self._data.shape[0]

    def columnCount(self, index):
        return self._data.shape[1]

    # Add Row and Column header
    def headerData(self, section, orientation, role):
        # section is the index of the column/row.
        if role == Qt.ItemDataRole.DisplayRole: # more roles
            if orientation == Qt.Orientation.Horizontal:
                return str(self._data.columns[section])

            # if orientation == Qt.Orientation.Vertical:
            #     return str(self._data.index[section])

class MainWindow(QtWidgets.QMainWindow):

    def __init__(self, *args, **kwargs):
        super(MainWindow, self).__init__(*args, **kwargs)
        uic.loadUi('PyQt_Webscrapping_TaiwanBank.ui', self)
        self.urlSearch()
        # Signals
        self.pBut_search.clicked.connect(self.urlSearch)
        self.pBut_exit.clicked.connect(self.close)
        self.comboBox_money.currentIndexChanged.connect(self.urlSearch)
        self.comboBox_year.currentIndexChanged.connect(self.urlSearch)
        self.comboBox_month.currentIndexChanged.connect(self.urlSearch)

    def urlSearch(self):
        money = {"美金":"USD", "歐元":"EUR", "英鎊":"GBP", "日圓":"JPY"}
        url = "https://rate.bot.com.tw/xrt/quote/" #2022-04/USD"
        url = url + self.comboBox_year.currentText() + "-" + self.comboBox_month.currentText()
        url = url + "/" + money[self.comboBox_money.currentText()]
        res = requests.get(url)
        # start html parsing
        soup = BeautifulSoup(res.content, 'html.parser')

        table1 = soup.find_all("td",class_="rate-content-cash text-right print_table-cell")
        table2 = soup.find_all("td",class_="rate-content-sight text-right print_table-cell")
        table3 = soup.find_all("td",class_="text-center")

        cash = [i.text for i in table1]
        sight = [i.text for i in table2]
        date = [i.text for i in table3]

        header = ["日期","現金買入","現金賣出","即期買入","即期賣出"]
        cash = np.reshape(cash, (int(len(cash)/2),2))
        sight = np.reshape(sight, (int(len(sight)/2),2))
        date = np.reshape(date, (int(len(date)/2),2))

        self.df = pd.DataFrame(date[:,0])
        self.df = self.df.assign(cashin = cash[:,0], cashout = cash[:,1])
        self.df = self.df.assign(buyin=sight[:,0], soldout=sight[:,1])
        self.df.columns = header
        self.model = TableModel(self.df)
        self.tableView.setModel(self.model)

        self.graphicsView.clear()
        self.graphicsView.addLegend(offset = (20,5),labelTextSize = "12pt")
        x = np.arange(len(sight[:,1]))
        # flip data to begin with day 1
        y1 = np.flip(sight[:,0].astype(float))
        y2 = np.flip(sight[:,1].astype(float))

        self.graphicsView.plot(x, y2, pen ='r', symbol ='o', \
            symbolPen ='r', symbolBrush = 0.2, name = header[4])
        self.graphicsView.plot(x, y1, pen ='g', symbol ='x', \
            symbolPen ='g', symbolBrush = 0.2, name = header[3])
        date_short =[i[5::] for i in date[:,0]]
        date_short = np.flip(date_short)
        # xtick = dict(enumerate(date_short))
        # self.graphicsView.getAxis('bottom').setTicks([xtick.items()])
        self.graphicsView.getAxis('bottom').setTicks([[(i, date_short[i]) for i in x[::2]]])
        # self.graphicsView.getAxis('bottom').setTicks([[(i, date_short[i-1]) for i in x]])
        self.graphicsView.setLabel('bottom', date[:,0][0][0:4]+'年')


def main():
    app = QtWidgets.QApplication(sys.argv)
    main = MainWindow()
    main.show()
    sys.exit(app.exec())

if __name__ == '__main__':
    main()
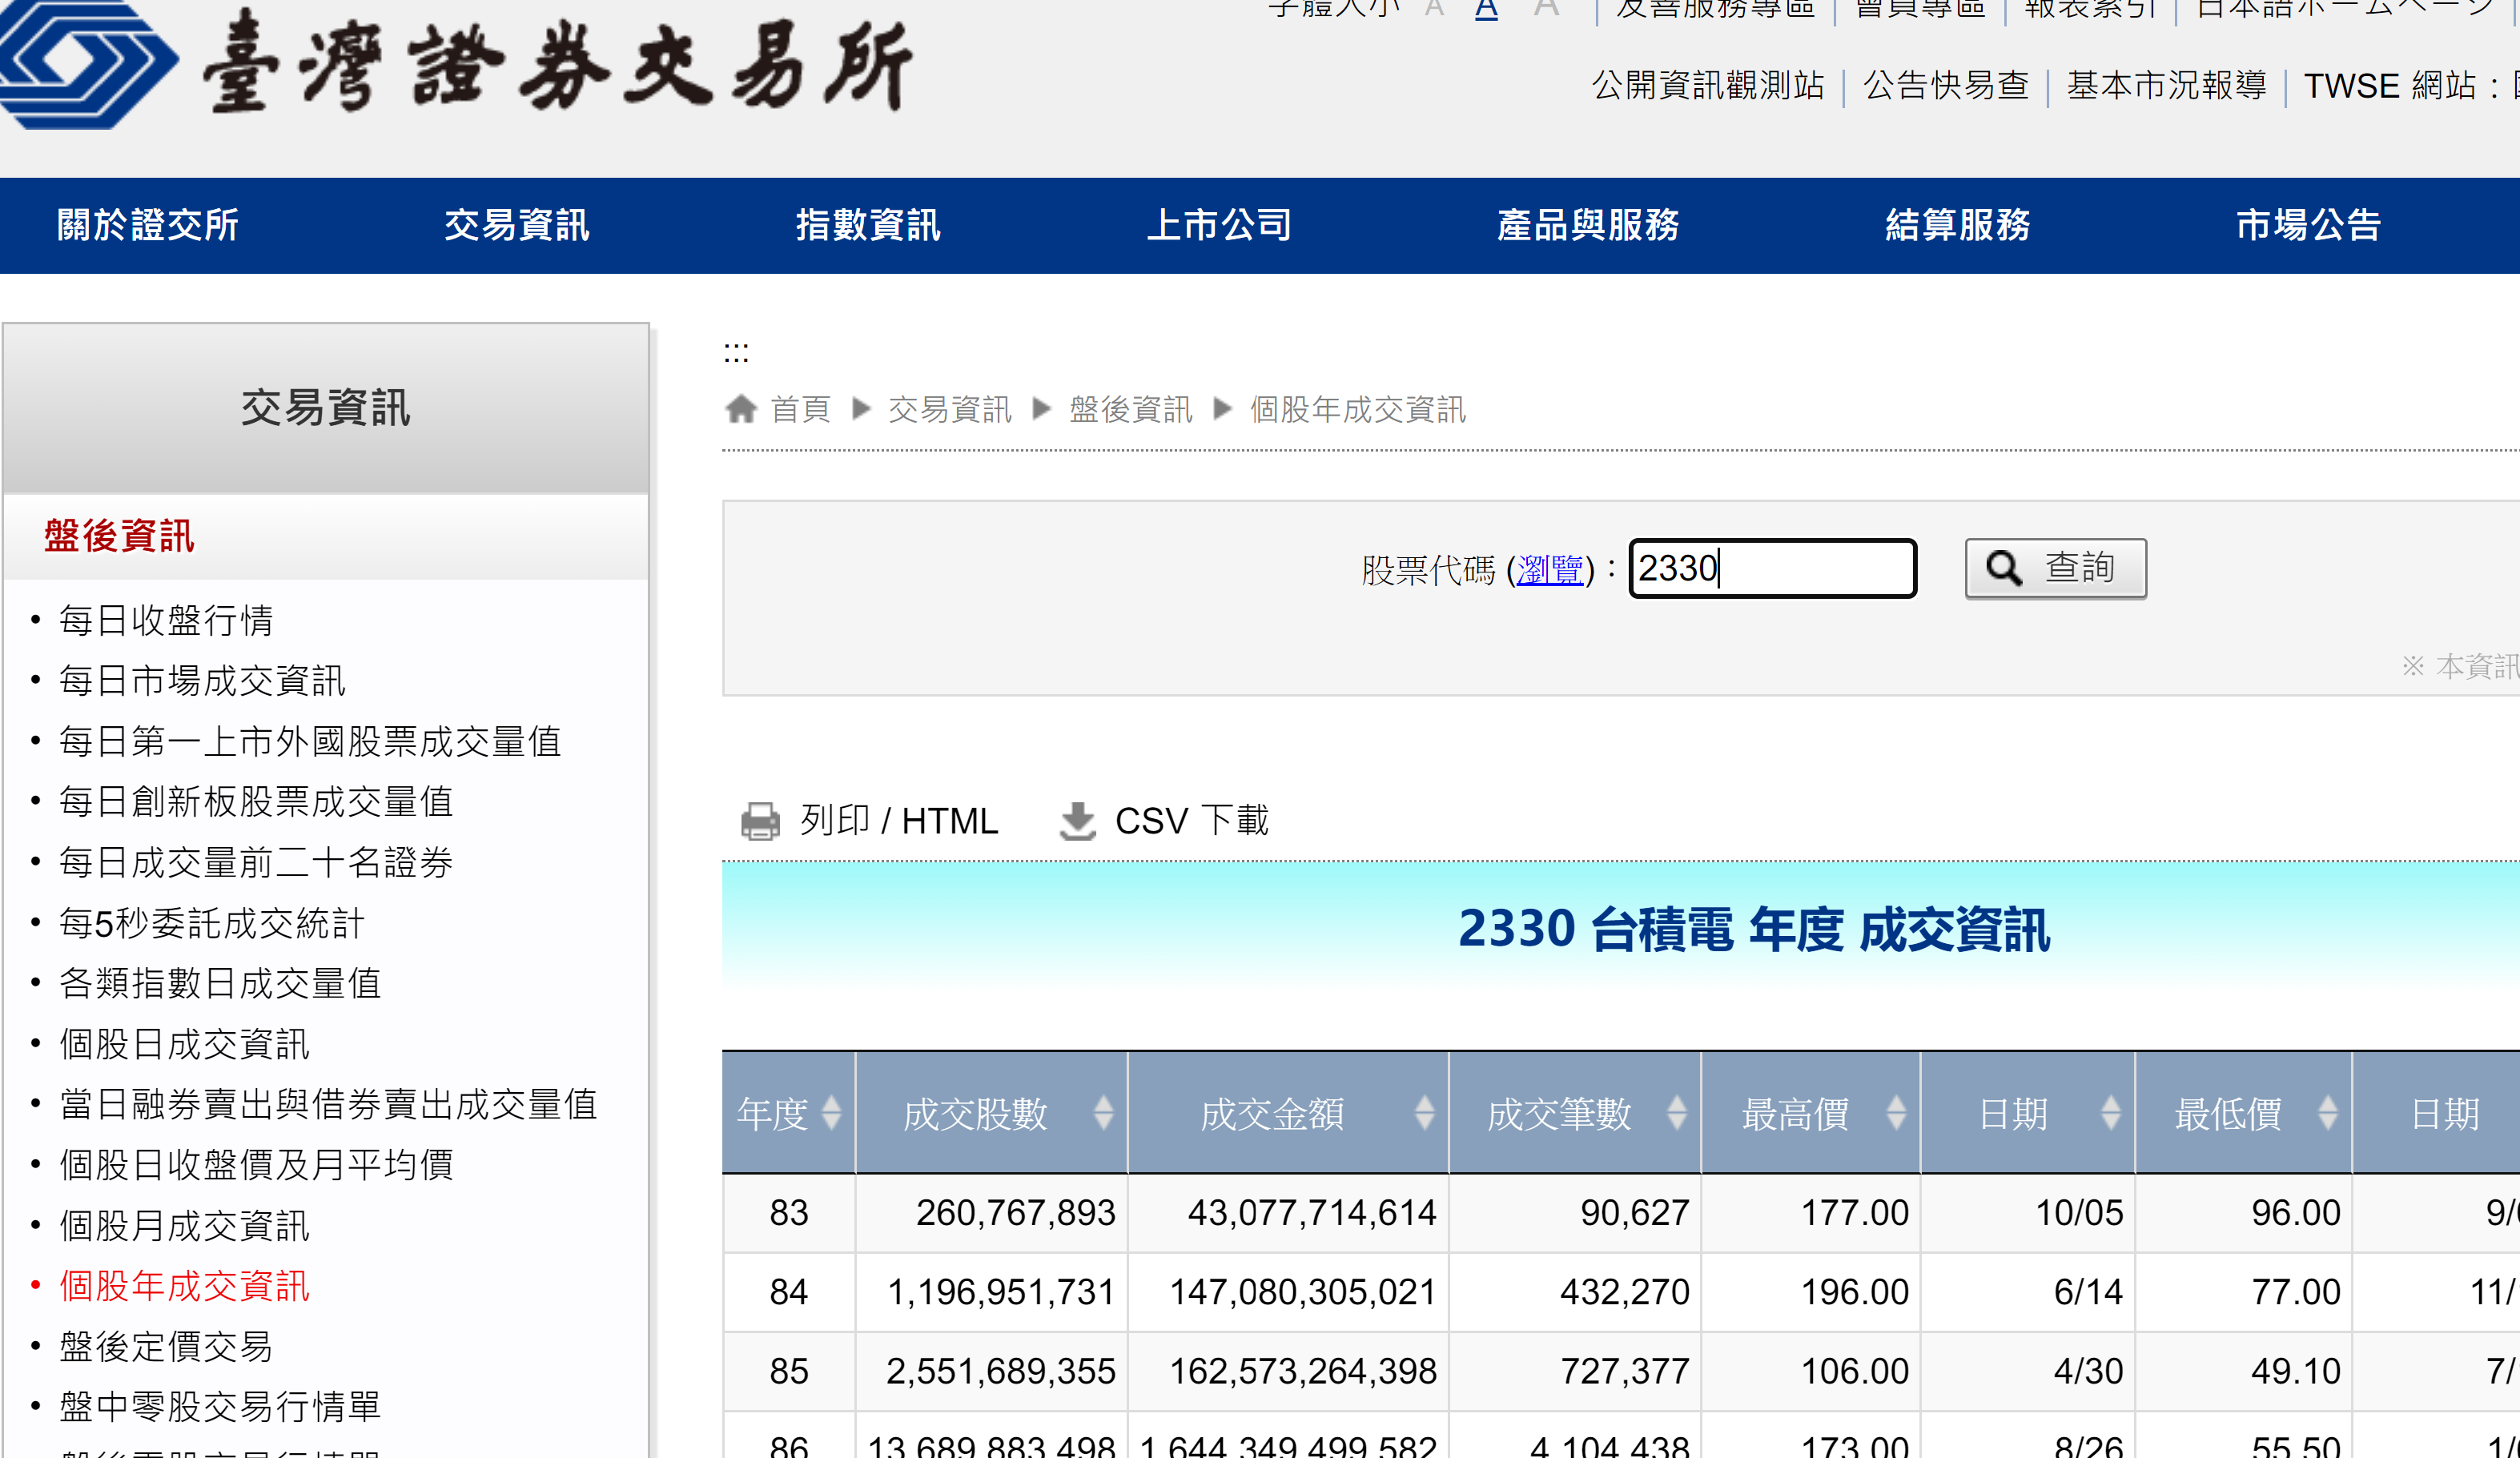
範例 4: 金融數據也是常見的網路爬蟲的對象。本範例以台灣證券交易所的歷史資料為例,是另一種簡單型態的網頁,如下圖一。該網頁甚至提供更簡潔的 HTML 網頁與 CSV 檔案供下載。本範例使用簡潔的 HTML 網頁,如圖二為例,製作一 GUI app 並加上折線圖。
目標網址:台灣證券交易所之個股年成交資訊:https://www.twse.com.tw/zh/page/trading/exchange/FMNPTK.html
程式功能:
根據股票代號查詢個股的年成交資料並繪製圖收盤平均價、最高價與最低價的折線圖。
另,可加入滑鼠的指標,秀出特定日期的數據。
程式碼與UI檔下載 包含另一個 JSON 的版本。
注意事項:
當以個股查詢時,其 HTML 版本的網址為(以台積電 2330 為例)https://www.twse.com.tw/exchangeReport/FMNPTK?response=html&stockNo=2330。讀者可以變更後面的個股代號以取得新的網址。
這個範例示範了如何擷取網頁中的表格資料,包括標題在內。不過,網頁表格有許多呈現的方式,甚至一張網頁裡面有多個表格,因此如何準確地找到關鍵字確實需要一些琢磨的功夫。
from PyQt6 import QtCore, QtWidgets, QtGui, uic
from PyQt6.QtCore import Qt
from bs4 import BeautifulSoup
from datetime import datetime
import numpy  as np
import pandas as pd
import requests
import sys

class TableModel(QtCore.QAbstractTableModel):

    def __init__(self, data):
        super(TableModel, self).__init__()
        self._data = data

    def data(self, index, role):
        if role == Qt.ItemDataRole.DisplayRole:
            value = self._data.iloc[index.row(), index.column()] #pandas's iloc method
            return str(value)

        if role == Qt.ItemDataRole.TextAlignmentRole:
            return Qt.AlignmentFlag.AlignVCenter + Qt.AlignmentFlag.AlignHCenter
            # return Qt.AlignmentFlag.AlignVCenter + Qt.AlignmentFlag.AlignLeft

        if role == Qt.ItemDataRole.BackgroundRole and (index.row()%2 == 0):
            return QtGui.QColor('#fff2d5')

    def rowCount(self, index):
        return self._data.shape[0]

    def columnCount(self, index):
        return self._data.shape[1]

    # Add Row and Column header
    def headerData(self, section, orientation, role):
        # section is the index of the column/row.
        if role == Qt.ItemDataRole.DisplayRole: # more roles
            if orientation == Qt.Orientation.Horizontal:
                return str(self._data.columns[section])

            # if orientation == Qt.Orientation.Vertical:
            #     return str(self._data.index[section])

class MainWindow(QtWidgets.QMainWindow):

    def __init__(self, *args, **kwargs):
        super(MainWindow, self).__init__(*args, **kwargs)
        uic.loadUi('PyQt_Webscrapping_Stock_Table_graph.ui', self)


        self.urlSearch()
        # Signals
        self.lineEdit_stock_no.returnPressed.connect(self.urlSearch)
        self.pBut_exit.clicked.connect(self.close)

    def urlSearch(self):
        stock_no = self.lineEdit_stock_no.text()
        url = "https://www.twse.com.tw/exchangeReport/FMNPTK?response=html&stockNo="+stock_no
        res = requests.get(url, cert = '', timeout=5)
        soup = BeautifulSoup(res.content, 'html.parser')
        stock_name = soup.find("h2")
        self.label_name.setText(stock_name.text)


        title = soup.find_all("thead")
        # tmp = title[0].find_all("td")
        headers = []
        for i in title[0].find_all("td"):
            headers.append(i.text)

        content = soup.find_all("tbody")
        tmp = content[0].find_all("td")
        deal_info = []
        for i in content[0].find_all("td"):
            deal_info.append(i.text)

        deal_info = np.reshape(deal_info, (int(len(deal_info)/len(headers)), len(headers)))
        data = pd.DataFrame(deal_info, columns = headers)
        self.df = pd.DataFrame(data)
        self.model = TableModel(self.df)
        self.tableView.setModel(self.model)
        # for i in range(8):
        #     self.tableView.resizeColumnToContents(i)
        self.tableView.resizeColumnsToContents()

        self.graphicsView.clear()
        self.graphicsView.addLegend(offset = (20,5),labelTextSize = "12pt")
        x = np.arange(len(deal_info))
        y = [float(i.replace(',','')) for i in deal_info[:,-1]]
        y_max = [float(i.replace(',','')) for i in deal_info[:,4]]
        y_min = [float(i.replace(',','')) for i in deal_info[:,6]]

        self.graphicsView.plot(x, y_max, pen ='g', name = headers[4])
        self.graphicsView.plot(x, y, pen ='r', symbol ='+', \
            symbolPen ='r', symbolBrush = 0.1, name = headers[-1])
        self.graphicsView.plot(x, y_min, pen ='y',  name = headers[6])

        date = deal_info[:,0]
        self.graphicsView.getAxis('bottom').setTicks([[(i, date[i]) for i in x[::2]]])
        self.graphicsView.setLabel('bottom', '年度')

def main():
    app = QtWidgets.QApplication(sys.argv)
    main = MainWindow()
    main.show()
    sys.exit(app.exec())

if __name__ == '__main__':
    main()