SML/Lesson 10: 使用 PyTorch 的產品:Facenet-Pytorch
- FaceNet 是由 Google 研發的人臉辨識與群聚的深度 CNN 模型。facenet-pytorch 則是將其組裝在 Pytorch 平台。另外當然也有 TensoeFlow 版本。
- FaceNet 對人臉辨識的方式是將每張人臉影像轉換為一高維度向量(512 x 1),並使同一個人的不同人臉影像所轉換出的向量在空間中盡可能接近。
- facenet-pytorch 主要有兩個深度學習的模型:MTCNN (Multi-task Cascaded Convolutional Networks) 與 InceptionResnetV1(Inception ResNet V1),其中 MTCNN 用於偵測影像中的人臉(多人),而 InceptionResnetV1 則將人臉的部分轉換為 512×1 的特徵向量。
以下範例參考網頁 facenet-pytorch | Pretrained Pytorch face detection (MTCNN) and facial recognition (InceptionResnet) models | Computer Vision library, 逐一介紹 facenet-pytorch 的使用方式。
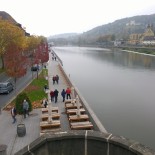
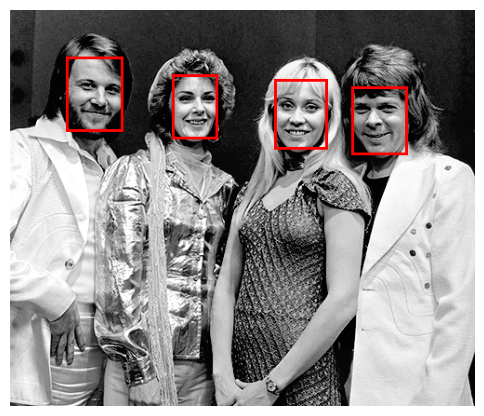
範例 1: 偵測一張影像中的人臉並加框標示。
-
mtcnn.detect(img) 偵測影像 img 內的所有人臉,將人臉以四個位置定位並輸出到 boxes。使用者應該去觀察 boxes 矩陣的大小及其內容,才知道接下來所繪製的紅色方框從何而來。
-
讀者應該多試幾張含有人臉的影像圖,看看 MTCNN 偵測人臉的能耐。會不會漏掉?或偵測錯誤?
from facenet_pytorch import MTCNN
from PIL import Image, ImageDraw
import matplotlib.pyplot as plt

# Initialize MTCNN for face detection
mtcnn = MTCNN()

# Load an image containing faces
imgfile = "pictures/abba.png"

img = Image.open(imgfile).convert("RGB")

# Detect faces in the image
boxes, _ = mtcnn.detect(img)

# If faces are detected, 'boxes' will contain the bounding box coordinates
if boxes is not None:
    for box in boxes:
        # Draw bounding boxes on the image
        draw = ImageDraw.Draw(img)
        draw.rectangle(box.tolist(), outline='red', width=3)

# Display the image with detected faces
plt.figure(figsize=(6, 6))  # Optional: specify the figure size
plt.imshow(img)
plt.axis('off')  # Optional: remove the axis
plt.show()
print("There are {} faces in the image.".format(len(boxes)))

範例 2: 接續前範例,將 MTCNN 偵測到的人臉透過 InceptionResnetV1 轉換為特徵向量。
MTCNN 有些參數選項,譬如較常用的:MTCNN(keep_all=True),專門偵測有多張人臉的影像,default 值為 False,即針對單一人臉影像。上一個範例雖然使用 MTCNN(),但使用 detect(img) 時,仍回傳端張人臉的位置(boxes),不過當需要進行人臉轉換為特徵向量時,仍必須使用 keep_all=True 的選項。其他參數可參考 help(MTCNN)。
本範例先使用 mtcnn.detect(img) 偵測人臉,在確定偵測到人臉後,使用 mtcnn(img) 將偵測到的所有人臉轉換為標準大小(160×160)的影像資料 aligned。讀者可以藉由觀察變數 aligned 的大小((4,3,160,160))與格式(Tensor)了解 mtcnn 做了甚麼事。
接著才能將標準大小的影像矩陣送入預訓練好的 InceptionResnetV1 模型進行特徵向量的轉換。 最後得到的結果存在變數 embeddings 這個 4×512 的 Tensor 矩陣,其中 4 代表偵測到的四張人臉,512 代表特徵矩陣。之後便可以利用特徵矩陣進行辨識或 clustering。請注意,InceptionResnetV1 有兩個預訓練模型可供選擇,讀者不妨都試試看。
請注意,使用 InceptionResnetV1 模型時的指令:resnet(aligned).detach() ,後面加個 detach() 是深度學習模型應用時常見的作法,理由如下:detach(): To stop tracking the computation history of the embeddings obtained from the resnet model, making them simple tensors that do not require gradients. This is typically done during inference to optimize performance.
from facenet_pytorch import MTCNN, InceptionResnetV1
from PIL import Image

# keep_all=True: keep all detected faces, otherwise only keep the face with the highest confidence
mtcnn = MTCNN(keep_all=True)

# Load pre-trained FaceNet model
resnet = InceptionResnetV1(pretrained='casia-webface').eval()

imgfile = "pictures/abba.png"
img = Image.open(imgfile).convert("RGB")

# Detect faces in the image
boxes, _ = mtcnn.detect(img) # boxes: [[x1, y1, x2, y2], ...] the positions of faces in the image
print("There are {} faces in the image.".format(len(boxes)))
# If faces are detected, extract embeddings
if boxes is not None:
    aligned = mtcnn(img)
    embeddings = resnet(aligned).detach() # embeddings: torch.Size([n, 512])

print(embeddings.shape)
範例 3:前一個範例已經使用 facenet-pytorch 這個產品的基本功能,即偵測人臉 + 轉換為特徵向量。本範例及後續的範例則是加入一些應用上可能做的事。譬如,將偵測到的人臉儲存成檔案。這裡示範人臉偵測可以儲存的影像型態,包括人臉定位的 bounding faces 與經過校正旋轉與大小統合的 cropped(aligned) faces。
右圖第一排是依照 MTCNN 偵測到的人臉定位(boxes)從原圖切割下來,因此大小不一;而第二及第三排則是透過 MTCNN.extract(img) 與 MTCNN(img) 將定位的人臉經水平校正(兩眼在一條水平線上)及大小調整為 160×160 後(方便轉換為特徵向量)。第二及第三排的圖是一樣的,只是做法與呈現方式刻意不同。
前兩排的圖也順便逐張存檔,作為人臉辨識的資料蒐集。
關於 MTCNN.extract(img) 說明如下: The mtcnn.extract() function returns cropped faces that are aligned based on the facial landmarks. This means that the faces are rotated so that the line between the eyes is horizontal. This is useful for facial recognition tasks, but it can make the faces look weird if they were tilted in the original image. Also these faces are not cropped to the same size (160×160), so you may need to resize them before using them in a neural network.
from facenet_pytorch import MTCNN
from PIL import Image
import matplotlib.pyplot as plt
from torchvision import transforms

# Initialize MTCNN for face detection
mtcnn = MTCNN(keep_all=True, post_process=False)
imgfile = "pictures/abba.png" # 1024x682x3
img = Image.open(imgfile).convert("RGB")
boxes, probs, points = mtcnn.detect(img, landmarks=True)
aligned_faces = mtcnn.extract(img, boxes, save_path=None)

# Display the bounding faces
fig, axes = plt.subplots(1, len(aligned_faces), figsize=(6, 3))
# If faces are detected, 'boxes' will contain the bounding boxes
if boxes is not None:
    for i, box in enumerate(boxes):
        # Crop the face from the image using the bounding box
        face_img = img.crop(box)
        face_img.save(f'pictures/bounding_faces_{i+1}.png')
        # Display the cropped face
        if len(aligned_faces) > 1:
            axes[i].imshow(face_img)
            axes[i].axis('off')
        else:
            axes.imshow(face_img)
            axes.axis('off')

# plt.title("Bounding faces")
fig.suptitle("Bounding faces", x=0.5, y=0.8)
plt.show()

# Display the cropped(extracted) faces
fig, axes = plt.subplots(1, len(aligned_faces), figsize=(6, 3))
# If faces are detected, 'aligned_faces' will contain the cropped faces
if aligned_faces is not None:
    for i, face in enumerate(aligned_faces):
        # face_img = face.permute(1, 2, 0).int().numpy()

        # Convert the PyTorch tensor to a PIL Image
        face_img = transforms.ToPILImage()(face/255).convert("RGB")
        face_img.save(f'pictures/cropped_faces_{i+1}.png')
        if len(aligned_faces) > 1:
            # axes[i].imshow(face.permute(1, 2, 0).int().numpy())
            axes[i].imshow(face_img)
            axes[i].axis('off')
        else:
            axes.imshow(face_img)
            axes.axis('off')
# want to display the title in the middle of the figure
fig.suptitle("Cropped faces", x=0.5, y=0.8)
# plt.title("Cropped faces")
plt.show()

# Detect face
faces = mtcnn(img)
# Visualize
fig, axes = plt.subplots(1, len(faces), figsize=(6, 3))
for face, ax in zip(faces, axes):
    ax.imshow(face.permute(1, 2, 0).int().numpy())
    ax.axis('off')
plt.show()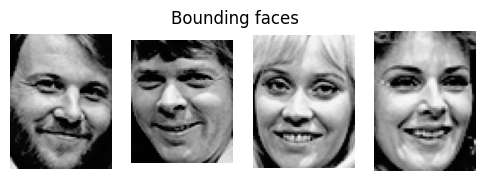


範例 4:比較兩張照片上的人臉是否為同一人。

afghan_girl_1 
afghan_girl_2 
afghan_girl_3 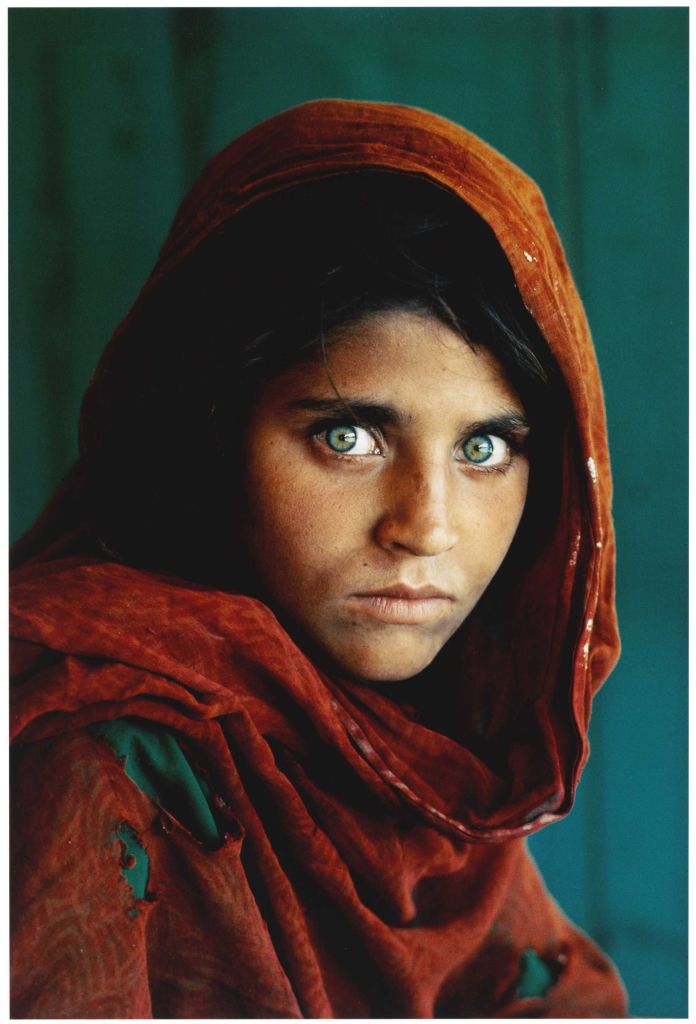
afghan_girl_4 本範例主要示範從特徵向量辨識兩張人臉的相似度。相似度的計算一般採取兩個向量在空間的歐幾里德(euclidean distance)距離,距離愈近代表愈相似。但多近的距離視為同一人,則需要進一步做些實驗。下列程式碼的 distance_1, distance_2 都是歐幾里德距離,在此刻意用不同的方式計算。
另外,cosine similarity 是大型語言模型裡常用的相似度,計算兩個向量之間的角度,角度愈小 cosine 值愈大,代表兩者愈相似。
from facenet_pytorch import MTCNN, InceptionResnetV1
from sklearn.metrics.pairwise import cosine_similarity
from sklearn.metrics.pairwise import euclidean_distances
from PIL import Image

# Initialize MTCNN for face detection
mtcnn = MTCNN()

# Load pre-trained Inception ResNet model
resnet = InceptionResnetV1(pretrained='casia-webface').eval()

# Load two face images to be verified
imgfile1 = "pictures/afghan_girl_2.jpg"
imgfile2 = "pictures/afghan_girl_3.jpg"
# imgfile1 = "pictures/Lenna.png"
# imgfile2 = "pictures/Lenna_old_hat.png"
img1 = Image.open(imgfile1).convert("RGB") # convert to RGB to avoid error
img2 = Image.open(imgfile2).convert("RGB")

# Detect faces and extract embeddings
faces1, _ = mtcnn.detect(img1)
faces2, _ = mtcnn.detect(img2)

if faces1 is not None and faces2 is not None:
    aligned1 = mtcnn(img1)
    aligned2 = mtcnn(img2)
    embeddings1 = resnet(aligned1.unsqueeze(0)).detach()
    embeddings2 = resnet(aligned2.unsqueeze(0)).detach()

    # Calculate the Euclidean distance between embeddings
    distance_1 = (embeddings1 - embeddings2).norm().item()
    distance_2 = euclidean_distances(embeddings1, embeddings2)[0][0]
    print("Euclidean distance: {:.4f}".format(distance_1))
    print("Euclidean distance: {:.4f}".format(distance_2))
    # Calculate the cosine similarity between embeddings
    distance_3 = cosine_similarity(embeddings1, embeddings2)[0][0]
    print("Cosine similarity: {:.4f}".format(distance_3))

    if distance_1 < 1.0:  # You can adjust the threshold for verification
        print("Same person")
    else:
        print("Different persons")
小結:以上範例示範了 facenet-pytorch 的幾項基本功能與使用方式:
- 從圖像偵測人臉(一張或多張)並可儲存人臉圖像檔。
- 將人臉圖像轉換為特徵向量。
- 比較特徵向量作為辨識的方法。
若從實際應用來看,還需要一些周邊的工具小程式;譬如,要做一個課堂的點名系統,還需要完成下列輔助程式:
- 從筆電(或手機)的攝影機為每個學生製作含 label (譬如學號、姓名)的特徵向量。每個人也許拍 10 張,含正面、側面或其他人臉面向,作為將來辨識的資料集。
- 將每張人臉圖像存檔及(或)轉換為特徵向量,並將所有的特徵向量蒐集在一個矩陣,方便上課現場辨識時,讀取、比對。
- 上課現場辨識時,可以採個人主動面對鏡頭或從攝影機捕捉在教室的學生人臉,接著立即辨識,並將辨識結果的 label 呈現在圖像上或存在 EXCEL 檔。
- 從攝影機捕捉人臉可以手動定格擷取圖像,或存成一小段影片,再從影片中擷取若干張圖像進行辨識。


